• About
    • Contact
    • Privacy Policy
  • Blog Setup Tutorial
  • Books
    • How to Make Money Blogging
    • Pro-Blogging Secrets
  • Courses
  • Login

Efficient Blogging

How I made an extra $1000/month with 5 minutes of work

July 7, 2016 By Bob Lotich Leave a Comment

How I made an extra $1,000/month with 5 minutes of work

Ok, this is a bit of a sensational chapter title, and just like The 4-Hour Work Week isn’t a literal guide to a four-hour work week but rather a guide to move you in that direction, this chapter’s goal is to show you a technique that will move you in that direction.

Even so, this technique did literally yield a bump of $1,000/month for me with just a few minutes of work. So, I hope you can use it to your advantage, as well.

I used Adsense to accomplish this, but in theory, any CPC ad network can yield the same results.

How it Works

Start by going to your top 10 most trafficked articles and see who’s showing up as advertisers. You may want to refresh the page a few times to see if different advertisers show up.

popular article advertisers

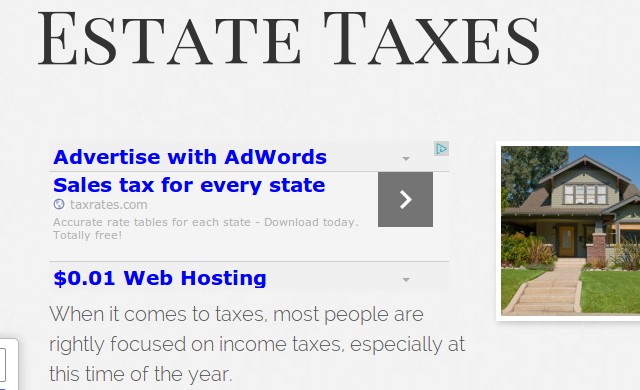
As you can tell from this image, taxrates.com seems to be paying for advertising with Google on my site. What we now want to do is go over to their site.

Of course, don’t click the ad since that’s click fraud. Just type it into your browser window.

Now look around and see if the site has an affiliate program. Oftentimes, sites have links to the affiliate program at the bottom of the page. If you don’t find one, send an email to ask whether they have one.

My biggest success with this method was from one of my highly trafficked pages. It was a small company that was extremely relevant to the post, and it did have an affiliate program. So I signed up, added an affiliate link to the post, and immediately started earning about $1,000/month just from those few minutes of work.

Filed Under: Affiliates, Monetization Tagged With: Ads, Adsense, Affiliates, no-thumb

How to get custom-sized Adsense units on your blog

July 7, 2016 By Bob Lotich Leave a Comment

How to get custom-sized Adsense units on your blog

Just recently, the Adsense team quietly rolled out custom-fit Adsense units which means, as you can guess, that you can create a custom height and width of your ad unit.

All you need to do is to create a new ad unit, and when you do, you will notice the site now has the custom option, just select that and you’re off to the races.

The pros of using custom-sized ads

The first pro is they will likely look better. Unless you designed your blog around the common ad sizes, there are probably places where you have ad units that just don’t quite fit as well as they could or you’d like. As a result, maybe they don’t look as nice as one that fits well.

Second, they will help fight ad blindness. Adsense units haven’t really changed their look in the past decade and so, almost everyone, including your grandma, can quickly identify them as ads and, consequently, will pay little attention to them. You now have the ability to break out of those old standard units and create a new size and shape that integrates nicely with your blog and may get more interaction from the readers.

The cons of using custom-sized ads

Your ads will almost exclusively be text ads. Since banner advertisers only create so many different sizes (300×250, 728×90, and 160×600 are the most common), you can bet you’ll see very few image ads in the 436×278 ad unit you created.

Because of the previous point, your earnings may suffer. Like everything, this is definitely worth testing to see if it legitimately hurts your earnings or not, but the Adsense folks do issue a warning that your earnings may drop when using these units.

I’ve used custom Adsense units as long as I’ve had access to them, and after testing on my site, I found no measurable earnings drop, and they fit better and looked better, so I’ve stuck with them.

Filed Under: Adsense Custom Ads Tagged With: Adsense, Custom-ads, no-thumb

How I Increased Adsense Earnings $1,500/month In Less Than 90 days

June 25, 2016 By Bob Lotich Leave a Comment

These are 9 simple steps I took to drive up my Adsense earnings by $1500/month - and you can do the same thing! 9 Steps I took to increase my Adsense Earnings $1,500/month

This post is going to be a little bit beyond the basics and I will provide details of how I dramatically improved earnings from Adsense.

Just to clarify, at the time of this increase I was already making some money with Adsense, but I had no idea how much difference a few tweaks could make. In my case I increased earnings over $1,500/m in a short amount of time.

The thing you have to understand about Adsense is that no two sites are alike. Every blog has a different audience and different articles and most likely a different layout, all these things affect Adsense earnings.

Knowing that, testing and trying new things is critical to find the winners!

UPDATE:  I’ve learned some NEW and awesome hacks

I wrote this post a few years ago and there are plenty of great tips in there, but since then I have stumbled on 3 Adsense hacks that have made me a ton more with Adsense and I would love to share them with you.

So I am holding a live workshop this Thursday where I will be walking through each of them step-by-step.

Just click here to save your seat!


1. Added A Privacy Policy

This is such a simple thing to do. I never realized that is a “requirement” for Adsense publishers, but when I added a link in my footer to my Privacy Policy there was a noticeable increase in earnings. I assume that Google rewards those who have a privacy policy and punishes those that don’t by trimming their earnings. In a perfect world you would want your lawyer to draft your privacy policy, but here is a sample template of a privacy policy to make your life a bit easier.

2. Put Ads Where People’s Eyeballs Went…

Adsense ad placement chartFor me there is an eternal struggle between usability and profitability with ads. While I want need to make money to pay my bills, I still want to make this site as user friendly as possible. So, I have made some sacrifices with this site in order to maintain certain levels of usability, but one of the main keys to making money with Adsense is ad placement.

Like I mentioned before, this needs to be experimented with. But for the first year or more of this site I just kinda threw the ads where ever I had extra room. Once I changed the location of my ads, my earnings tripled overnight. It really freaked me out. I had no idea that just moving an ad a couple inches would have such a dramatic effect. The diagram to the right (from Google) provides some good starting point for what locations work and don’t.

3. Section Targeting

This was another tweak I made that made a noticeable difference in earnings. Basically “section targeting” is telling Google what text on your site to look at when deciding what ads to show. Google is pretty good at figuring this out if you don’t do this, but if you have a lot of stuff going on in your sidebars and footer sections, it is probably worth experimenting with. It is very easy to implement. You only need to use this tag…

to tell Google to start, and this tag…

…to tell them to stop. I just added a text widget at the top of my post for the start tag and after the content for the end tag.

4. Who Sees Ads Plugin

This is a great plugin that allows you (as the name suggests) choose which visitors see which ads. There are lots of criteria that you can select, so you can specify that Search Engine users see a particular Adsense unit when regular readers see something else. I have found that search engine visitors click Adsense ads a lot more than regular readers. I still show some Adsense to regular readers, but I focus my energy on the visitors from search engines – this plugin makes this very easy.

5. Changed The Colors

When Adsense first came out, people said to make the colors as loud and ugly as possible to draw attention to them. Next I heard that the best thing to do was to blend them into the site. Of the two methods I think that blending works a little better, and definitely looks a lot better! But, I have a slight variation of that has worked even better for me.

Currently I have have most of my links set to a lighter blue color. I used to have many of my Adsense ads match that, but I saw a nice increase when I changed the Ad titles to the old standard Link Blue. I feel that visually it is a complement rather than a match. It stands out a little bit more, but doesn’t look bad either – IMO…

6. Wrote Articles People Are Searching For

This might seem unrelated, but it is very important. If you are like most bloggers, you have a regular readership and you have readers from the search engines. For some reason, a lot of bloggers just don’t give much respect to search engine readers and don’t really try to reach out to them other than trying to “convert” them to a regular reader. I approach things a little bit differently, rather than getting frustrated at the fact that so many search engine visitors don’t come back, I started to embrace it. I realized that my main goal of this site was to help people, so why should I care if they only visit once or on a daily basis if they are getting helped?

So while I very much appreciate and value my regular readers, I also understand that I can help those who find the site via a search engine. I started doing keyword research to see what people were looking for in the search engines. If there are people searching to find the highest paying jobs without a degree, I want to help them find out! What happened for me as I started to become more conscious of what people were searching for was that I started getting more search engine traffic – which of course leads to higher earnings from Adsense.

7. Added A Google Search Bar

This is a no-brainer. Google is the master of search, so you can bet that their search capability on your site is going to be better than the default WordPress search tool. By installing this, you will help your visitors find the information that they are looking for on your site and make some extra cash in the process. When the search results (from the websites you choose) are displayed they have the standard Google ads present, just like normal Google search results.

8. Hooked Google Analytics Up With Adsense

A few months ago, Analytics started allowing the option to integrate your Adsense data. This has been so helpful for me. It provides bloggers with a wealth of information about earnings. It is simple to see which articles are making the most money, which keywords are yielding the most, what sites send the most valuable traffic, and a whole lot more. If you use Adsense, don’t pass this one up.

9. Tested, Re-Tested, And Tested Again…

When running Adsense tests, I typically let them run for a month in order to make sure they are very thorough. I have a calendar that I use to mark down when I make changes and what changes I make. Then when the test is complete I compare CPM and eCPM rates to see what performed better. A/B split testing is a better method when possible, but for certain tests is just isn’t possible or practical. But either way, if you want to make more money with Adsense, experimenting and testing is a must!

Double or triple your Adsense earnings
with these 3 hacks

adsense-earnings
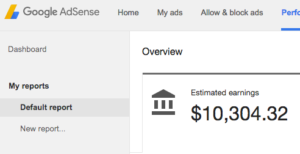
Join me for a FREE live workshop Thursday night, where I will show what I have learned from hundreds of tests since writing this post.

I found 3 simple hacks that you can use to easily 2X or even 3X your Adsense earnings and I would love to teach you!

One of them only takes 5 minutes to implement!

Click here to register for FREE

Filed Under: Monetization Tagged With: Adsense

  • About
  • Free Book
  • Contact
  • Free Blog Setup Tutorial
  • Course Login

Copyright © 2022 EfficientBlogging.com